Introduction to Foam Clay Sculpting
Foam clay sculpting is one of the most approachable and imaginative ways to create lightweight art, props, costumes, decor, and detailed three-dimensional forms without the intimidation of traditional stone, wood, or ceramic work. At its core, foam clay is a soft, moldable material that usually contains tiny foam particles blended into an air-drying clay base. That combination gives it a unique texture that feels flexible, forgiving, and easy to shape by hand. For beginners, it offers a welcoming path into sculpture because it does not require firing, heavy tools, or advanced studio equipment. For experienced makers, it opens up creative possibilities for texture, layering, detailing, and hybrid builds.
A: Yes. It is one of the easiest sculpting materials to start with because it is lightweight, forgiving, and air dries without special equipment.
A: For many projects, yes. A base helps save material, adds structure, and makes larger shapes much easier to build.
A: Absolutely. A small amount of water helps smooth the surface, blend seams, and make the clay easier to shape.
A: Drying time depends on thickness and room conditions, but thicker projects naturally take longer than thin decorative layers.
A: Yes. Acrylic paints are a popular choice and can dramatically improve the depth, texture, and final look of the piece.
A: Yes. Foam clay is often built in stages, which makes it easy to patch, refine, and add extra detail later.
A: It is often used for cosplay details, props, masks, ornaments, fantasy art, decorative surfaces, and lightweight sculptural builds.
A: No. One of its biggest advantages is that it dries much lighter than many traditional sculpting materials.
A: Yes. Water, sculpting tools, and post-dry refinement can help create either a polished or intentionally textured result.
A: Start with a small textured ornament, a simple decorative trim piece, or one detailed costume element so you can learn the material gradually.
Why Foam Clay Has Become So Popular
Part of the appeal of foam clay sculpting is how accessible it feels from the first touch. Unlike some sculpting materials that punish mistakes, foam clay invites experimentation. You can press it, smooth it, build it up, carve it lightly, and even add more after it begins to dry. It adheres well to many surfaces, especially EVA foam, which makes it a favorite in cosplay, theater design, model making, and craft-based sculpture. Artists love that it can create raised ornament, organic textures, creature details, decorative surfaces, and small sculptural features without adding much weight. That balance of ease and versatility has helped foam clay become a go-to material for makers who want professional-looking results with a more beginner-friendly process.
What Foam Clay Actually Is
Foam clay is not the same thing as rigid insulation foam, soft upholstery foam, or carved craft foam sheets. Instead, it is a pliable, spreadable, shapeable sculpting compound that air dries into a lightweight but semi-firm finish. Many artists use it to add dimension to foam armor, masks, fantasy props, ornaments, and display pieces. When fresh, it can feel almost like a whipped or slightly grainy modeling paste. Once dry, it keeps much of its formed shape while remaining lighter than many traditional clays. Because of its foam content, it often has a softer finished feel than ceramic-style air-dry clay, but that softness can be a creative advantage when making wearable art or decorative builds that should not become overly heavy.
How Foam Clay Differs from Traditional Clay
Traditional clay, whether earthen, polymer, or air-dry, often emphasizes smooth mass, crisp carving, or hard-setting structure. Foam clay works differently. It is ideal for surface building, dimensional detailing, lightweight sculptural additions, and stylized textures rather than fine ceramic realism alone. That does not mean it cannot be detailed, but its character encourages a slightly different mindset. Instead of treating it like stone to be carved away, makers often treat foam clay as a material to push, blend, layer, and refine. It is especially effective when used over a base form, such as EVA foam, wire armatures, cardboard structures, or lightweight cores. In that sense, foam clay becomes a bridge between sculpting and fabrication.
Who Foam Clay Sculpting Is Best For
Foam clay sculpting is ideal for beginners, hobbyists, costume makers, prop builders, creative parents, classroom artists, and DIY crafters who want a material that feels less intimidating than more technical sculpting systems. It is also excellent for people who enjoy fantasy design, cosplay builds, creature art, decorative letters, faux textures, masks, seasonal crafts, and one-of-a-kind handmade gifts. Because it air dries and needs only a modest workspace, it works well for home studios and casual craft tables. It also suits artists who want to experiment with sculptural form without committing to expensive tools, kilns, or heavy-duty workshop equipment.
What You Can Make with Foam Clay
The beauty of foam clay sculpting lies in how broad the creative range can be. You can use it to make dragon horns, mask details, costume armor embellishments, flower petals, decorative frames, wall pieces, fantasy weapons, creature skin textures, small figurines, and themed party decor. It can help transform simple foam bases into intricate visual designs that appear much more complex than they are. Many artists use it to create raised filigree, stone-like texture, carved wood illusions, scales, bark, organic ridges, stitches, seams, and ornamental trim. Because it works so well on EVA foam, it is especially loved in costume and prop communities where lightweight detail is essential.
Essential Tools and Materials to Get Started
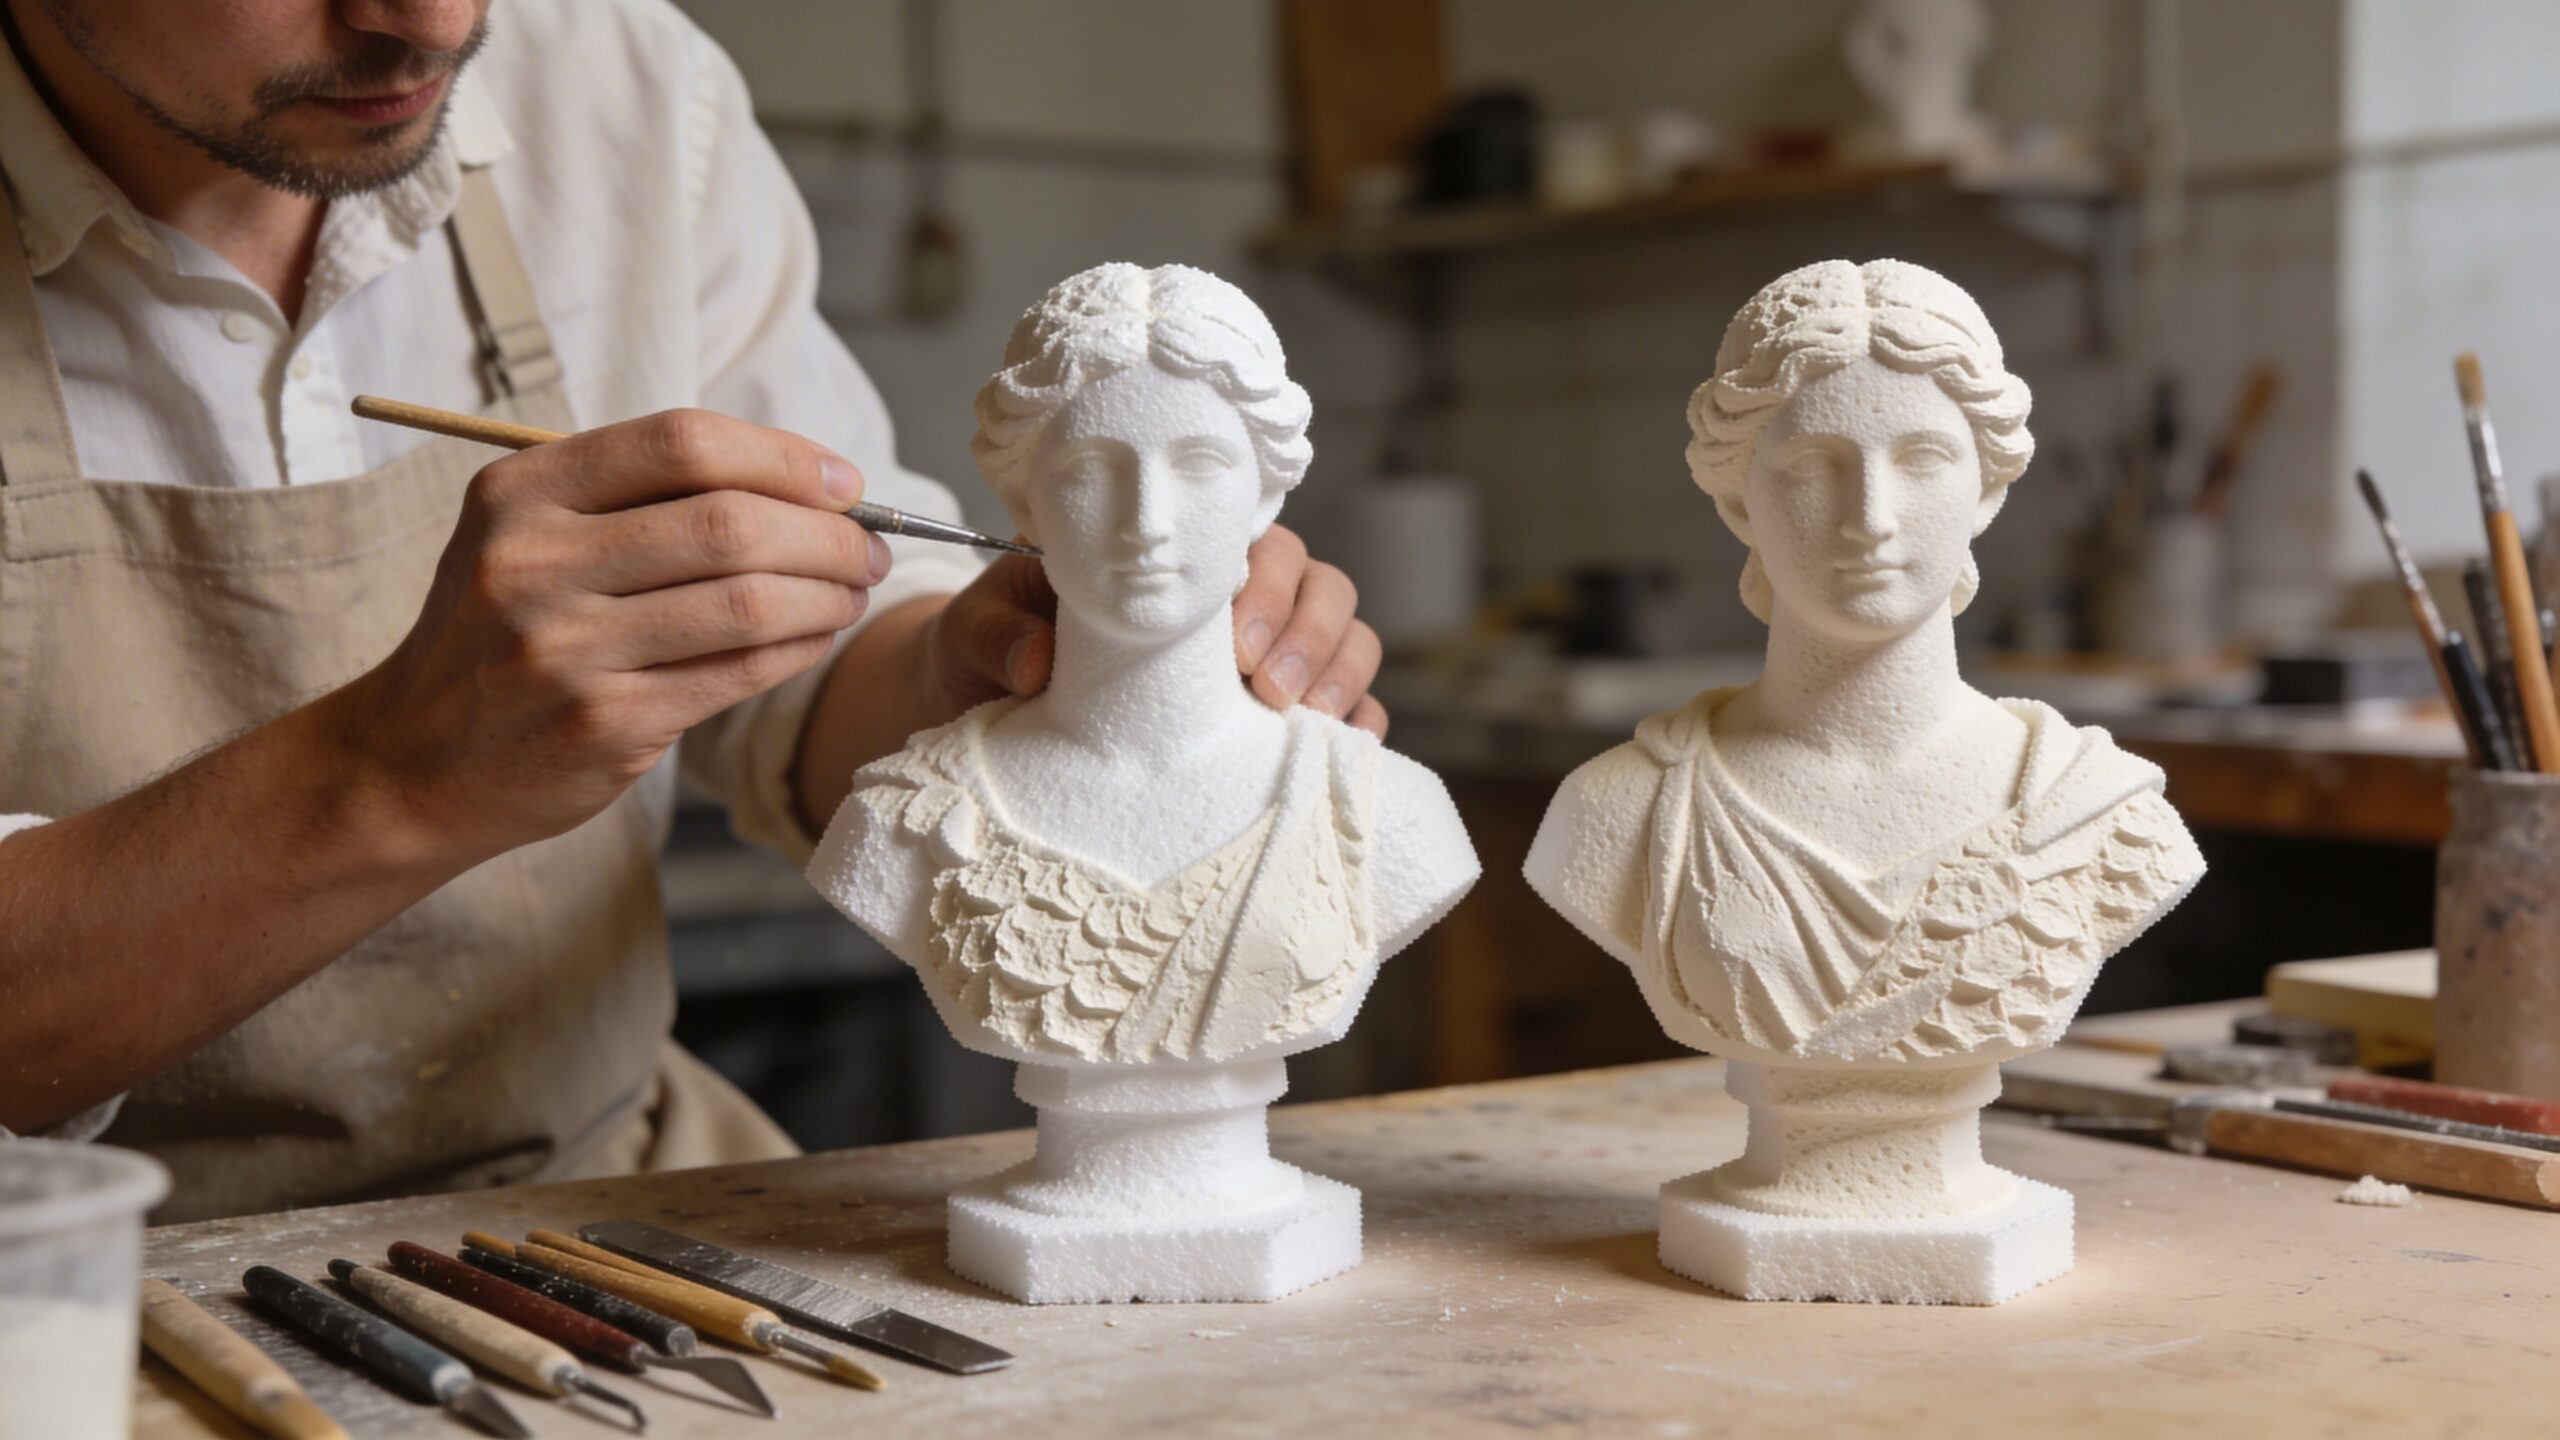
Starting with foam clay sculpting does not require a huge shopping list, which is part of its charm. A container of foam clay, a clean workspace, a little water, and your hands are enough to begin. Still, a few simple tools can make the process much easier. Silicone sculpting tools help smooth and shape the surface. Small spatulas are useful for pressing material into corners. Craft knives can refine dried areas when used carefully. Fine sandpaper may help with gentle surface cleanup once the clay is fully dry. A base structure such as EVA foam, cardboard, aluminum foil, or wire can support more ambitious pieces. Acrylic paints and a primer or sealant are also helpful for finishing the work after drying.
Preparing Your Workspace for Success
Before beginning your project, set up a space that supports focus and cleanliness. Foam clay is friendlier than many crafting materials, but preparation still makes a difference. Cover the table with a protective sheet or mat, keep a bowl of water nearby, and have paper towels ready. Water is especially useful because it helps smooth seams, soften edges, and prevent the clay from dragging as you work. Good lighting is important too, especially when shaping texture or symmetry. It helps to think of your workspace not as a perfect studio, but as a creative zone where materials are within easy reach and the flow of making feels simple rather than stressful.
Step One: Choose Your Project Idea
Every strong foam clay project begins with a clear idea. For beginners, the best choice is often a small and manageable design that lets you explore the material without becoming overwhelmed. That could be a decorative medallion, a fantasy horn, a textured ornament, or a simple sculpted embellishment on a foam base. If you are interested in cosplay or prop building, start with a single detailed component rather than an entire costume piece. A focused project gives you a chance to understand how the clay stretches, smooths, dries, and responds to shaping. That early familiarity is more valuable than jumping immediately into something massive.
Step Two: Build or Gather a Base Form
Foam clay often performs best when used over a structure. That base can be as simple as EVA foam, a cardboard cutout, a ball of aluminum foil, or a pre-shaped craft object. The base provides support, saves material, and makes larger sculptural forms easier to control. For example, if you want to make a creature head, decorative mask, or raised costume detail, shaping the base first gives the foam clay something to grip. Instead of trying to sculpt the entire piece from clay alone, you are creating a smart framework and then using the clay to bring the surface to life.
Step Three: Condition the Foam Clay
Once you open the foam clay, knead a small amount in your hands to wake it up. This helps make the texture more even and workable. If it feels slightly dry, a tiny amount of water can restore softness. If it feels sticky, work in smaller portions instead of using too much at once. Foam clay rewards patience. Rather than applying a giant mass all at once, build gradually. Smaller amounts are easier to control, smoother to blend, and more responsive to detail. Learning this rhythm early makes the entire sculpting process more enjoyable.
Step Four: Apply the Clay to the Surface
Press the foam clay onto the base and begin shaping it where you want dimension. You can spread it thinly for raised ornament, build it thicker for sculptural form, or layer it in sections for more complex volume. Use your fingers to press it into the surface so it adheres well. Then use a sculpting tool or damp fingertip to refine the edges. This stage is where the material starts to reveal its strengths. It does not demand perfect technique from the start. You can move it, nudge it, add to it, and smooth transitions until the form begins to look intentional.
Step Five: Shape the Major Forms First
One of the most important habits in foam clay sculpting is to focus on major forms before chasing detail. Build the overall silhouette first. Establish the curve of the horn, the thickness of the trim, the rise of the texture, or the shape of the face before worrying about fine lines or tiny embellishments. This keeps the piece structurally balanced and visually strong. Many beginners rush to detail too early, only to realize the underlying shape is not working. A better approach is to create the broad forms, step back, view the piece from multiple angles, and then move into refinement.
Step Six: Add Texture and Detail
Once the main shape is in place, you can begin the most exciting part: the details. Foam clay is excellent for textures because it responds beautifully to pressing, poking, smoothing, and patterning. You can create bark, scales, worn stone, carved flourishes, stitched seams, petals, ridges, or weathered fantasy surfaces with simple tools or even household items. Toothpicks, silicone tips, brushes, crumpled foil, and rounded sculpting tools can all leave interesting marks. This is where your project develops personality. A plain form becomes expressive through surface language, and that transformation is often what makes foam clay sculpting so satisfying.
Step Seven: Blend Seams and Refine Edges
Seams are natural when building in sections, but they do not need to remain visible. A little water and a gentle touch can help blend one area into another. Use a damp finger or soft sculpting tool to smooth transitions, soften harsh lines, and unify the form. This stage is especially important if you are building costume details or decorative surfaces that should look integrated rather than patched together. Refining edges also improves the final painted result. The cleaner your structure is now, the more polished the finished piece will appear later.
Step Eight: Let the Piece Dry Properly
Drying is where patience becomes part of the craft. Foam clay dries through air exposure, and thicker pieces need more time than thin decorative layers. Rushing this stage can lead to dents, warping, or paint issues later. Leave the piece in a dry, ventilated area and avoid handling it too much until it has firmed up. Depending on thickness and room conditions, drying may take many hours or longer. It helps to remember that the drying phase is not wasted time. It is part of the sculpting process, allowing the form to settle into its final lightweight structure.
Step Nine: Smooth, Repair, and Refine After Drying
After the clay has dried, inspect the surface carefully. This is the time to correct small imperfections, fill shallow gaps, and lightly refine the finish. Some makers add a little fresh foam clay to problem areas and blend it in for a second pass. Others lightly trim or sand select spots once the material is stable. The goal is not to erase all character, but to decide what kind of finish you want. Some projects benefit from a handmade organic texture, while others look better with a smoother, cleaner surface. Your design style should guide that decision.
Step Ten: Prime, Paint, and Finish the Sculpture
Painting is where foam clay sculpting truly comes alive. Once dry, the project can be primed if needed and then painted with acrylics or other foam-safe finishes. Even a simple color scheme can dramatically elevate the piece by defining shadows, highlights, age, depth, and mood. Metallic tones can make decorative trim look ornate. Earthy washes can create stone or wood illusions. Bright layered colors can push the project toward fantasy or playful craft design. A final sealant may help protect the surface depending on how the piece will be used. Finishing is not just decoration. It is the stage that reveals the full visual story of the sculpture.
Common Beginner Mistakes to Avoid
Many first-time makers use too much material too quickly, which can make the piece harder to control. Others rush into tiny details before the main form is convincing. Some skip the base structure and struggle with sagging or wasted material. Another common mistake is painting before the piece is fully dry, which can affect adhesion and finish quality. Fortunately, foam clay is forgiving enough that these mistakes become lessons rather than disasters. The more you work with it, the more you develop a sense of timing, thickness, texture, and balance.
Creative Ideas for Improving Your Results
A simple way to improve your foam clay sculpting is to think in layers. Build the form, refine the surface, and then finish with intentional paintwork. Study real textures like bark, bone, stone, petals, leather, or carved trim and translate them into stylized versions. Take progress photos so you can evaluate your work from a distance. Use references even for fantasy projects because reference builds confidence in shape. Most importantly, let yourself experiment. Foam clay is at its best when treated as both a technical and playful material.
Why Foam Clay Sculpting Is Such a Rewarding Craft
Foam clay sculpting offers something many creative hobbies promise but do not always deliver: a low barrier to entry with room for serious artistic growth. It can be simple enough for a first project at the kitchen table and sophisticated enough for advanced costume detailing, theatrical props, and gallery-worthy handmade decor. It invites imagination, tactile exploration, and visible transformation from humble materials into bold finished forms. Whether you are making a fantasy accessory, a decorative sculpture, or your very first textured art piece, foam clay gives you permission to build, refine, and invent. That sense of creative freedom is exactly why so many artists keep coming back to it.
Conclusion: Start Simple and Keep Sculpting
If you have ever wanted to try sculpture but felt intimidated by the process, foam clay is an excellent place to begin. It is lightweight, versatile, expressive, and approachable. More importantly, it turns creativity into action quickly. You do not need a kiln, a workshop, or years of training to make something memorable. You need a project idea, a little patience, and the willingness to shape material with curiosity. Start with something small, trust the process, and let each piece teach you something new. Foam clay sculpting is not just a technique. It is an invitation to create worlds with your hands.


